
Appearance
Setting up Yapii
This page is the order to do things in. Each step says what it is for, what to do, and what to watch out for, then points to the page with the full instructions.
You do not need to finish it today. Nothing breaks if you stop partway, and your Dashboard keeps a account check of what is left.
If you are brand new, start with Your first day. It covers signing in, verifying your email and the setup wizard. This page picks up from there and takes you to the end.
Start here
Pick the one that sounds most like you. The steps are the same for everyone, but these are the ones worth doing first.
| If you want to | Start with |
|---|---|
| Stay in touch with past clients | Steps 3, 6 and 9: your contacts, your sending domain and the monthly home value email. |
| Have new leads followed up for you | Steps 10, 12 and 14: Claire, consent, and where your leads come from. |
| Move over from your current CRM | Step 3 first, then step 10. Bring your contacts across, then let Claire work them. |
| A bit of everything | Work straight down the list. It is already in a sensible order. |
Your first 15 minutes
These five steps are the setup wizard. Your first day walks through the screens.
1. Accept the data agreement
This is the only paperwork. It confirms Yapii may handle your contacts' information on your behalf.
Type your full legal name and the email address the signed copy should go to, confirm you can accept for your business, then click I Accept - Continue.
2. Tell Claire about you
Claire introduces herself on your behalf, so she needs your name, your market and some proof of your track record.
Enter your name, the name clients know you by, and your market. If you're the owner, pick your time zone too. The box starts with the zone your browser reports, and you can search any zone by city, region or offset. Owners also enter the Business mailing address (street, city, state and ZIP code), which is needed to continue and can be changed later in Settings. Add your evidence of success, then click Get Started.
Specific numbers beat adjectives. "Top producer" tells a seller nothing. "Sold 42 homes in Scottsdale last year, averaging 101% of list price and 18 days on market" gets a reply.
3. Bring in your contacts
Yapii cannot help with people it does not know about. This is the step that makes everything else work.
Choose Connect your CRM if you use one, or Upload a CSV if your contacts are in a spreadsheet. See Importing contacts for the column matching, duplicates and Follow Up Boss.
Before it runs, the wizard asks what should happen next: Just import, Start automations or Automations + Claire. Two of those send to the people in your file, so pick Just import if you are not sure. See What happens after the import.
Include addresses
Add street address, city, state and zip wherever you can. That is what switches on home value tracking for your past clients.
4. Get your phone number
Your workspace has its own phone number, and every call and text Claire sends your leads goes out from it. Replies come back to your Inbox.
Pick an area code your clients will recognize, then claim the number.
Your workspace needs its own number
Texts and calls go out from your workspace's own number, not from a shared one and not from your personal line. Make sure you have claimed one.
You can change it later under Settings, then Phone, Texts & Calls.
5. Take the two-minute tour
A quick look around, so the rest of the screens feel familiar.
On the You're all set! screen, click Take a tour. When you land on the Dashboard, look for the account check card. It lists what is left, one row per step, each with a button.
That is the hard part done. Everything from here is about switching things on.
Your first day
6. Verify your sending domain
Verifying your own domain means your email comes from your own address instead of Yapii's shared one, which is what keeps it out of spam.
Go to Settings, then Email & Sending, and start the domain wizard. Copy the records it shows into your domain provider. Yapii checks every 30 seconds, so you can leave the page open.
Full instructions, including what each status means, are in Your sending domain.
Start this early
Record changes can take from a few minutes to a few hours to go through. Start it now and carry on with the next step while you wait. Not sure where your domain is managed? Send the records to whoever built your website.
7. Add your face and brand
Your headshot and logo go on every homeowner email and report. People reply to someone they recognize.
Go to Settings, then Branding, and fill in Agent Identity: a headshot, your brokerage logo, your brokerage name, website and a short bio. Check your photo, phone and time zone under Settings, then Profile.
See Branding for sizes and what each field changes.
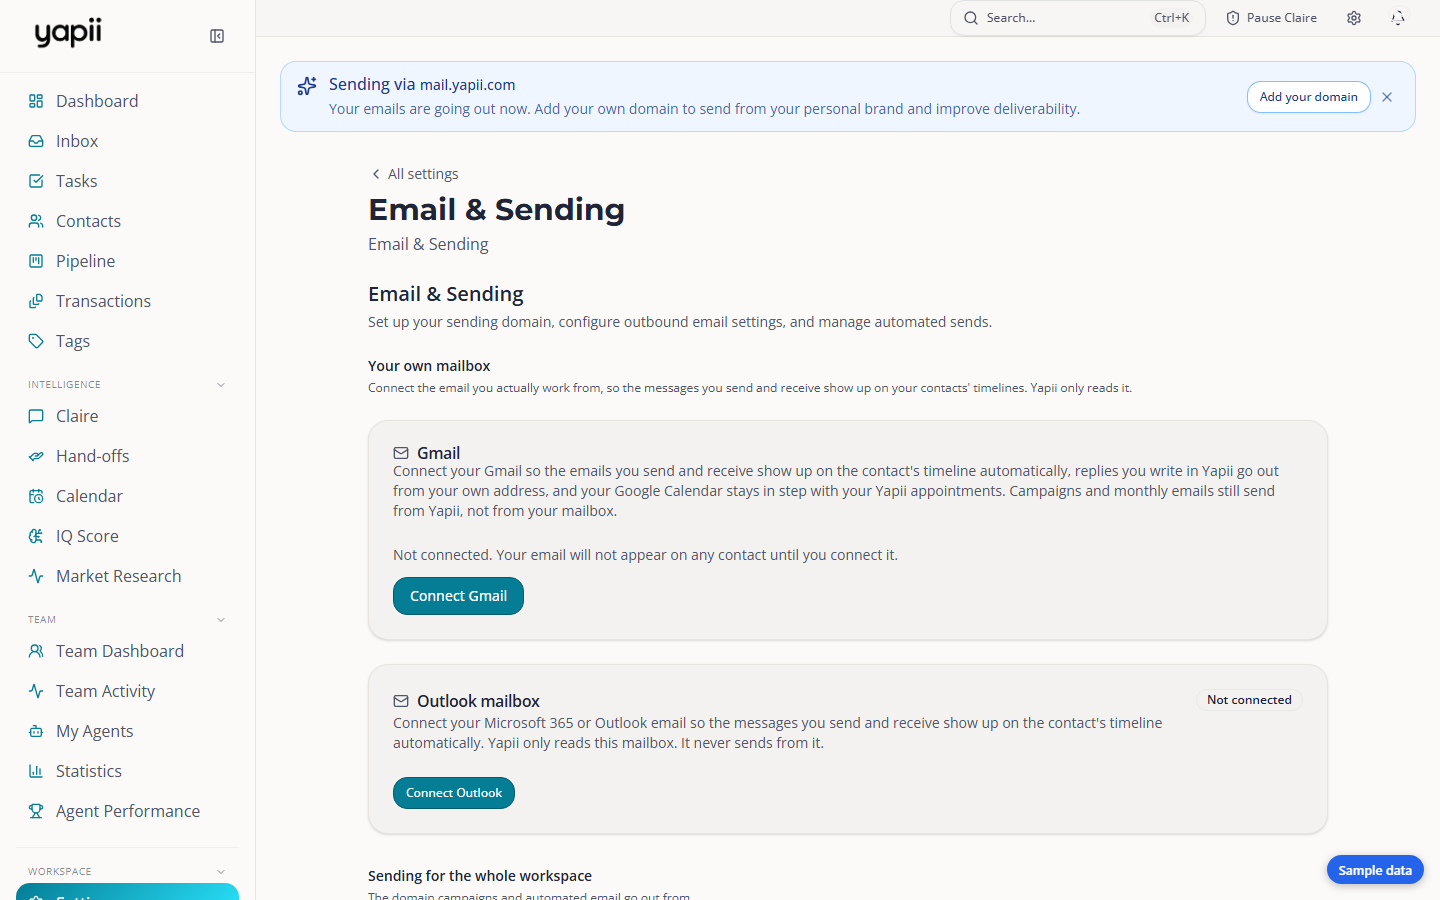
8. Connect your mailbox
Your email conversations then show up on each contact's timeline, so you and Claire always have the full story.
Go to Settings, then Email & Sending, and under Your own mailbox click Gmail or Outlook and sign in.
This only reads your mail
Connecting your mailbox lets Yapii put conversations on the right contact. It does not send from your mailbox.
9. Switch on the monthly home value email
Every homeowner gets a branded snapshot of their home's value each month, and the ones who engage show up for you.
Go to Settings, then Email & Sending, find Monthly home-value email, send yourself a preview, then switch on Enabled for this workspace.
Contacts need an email address, and a street address for the home value. See Monthly home value email for who receives it and how to exclude someone.
Your first week
10. Start Claire on your first lead
Claire works your leads around the clock and stops as soon as someone needs you.
Check Claire is switched on under Settings, then Billing, on the Plan tab, under Claire and Automation. Then open any contact and click Start Claire. To start several at once, tick them on Contacts and click Start Claire on the number you picked.
Meet Claire explains what she does, and Approving, pausing and taking over covers staying in control.
A low-risk first try
Start with 5 to 10 older leads you have not had time to call. It is an easy way to hear how Claire sounds.
Need her to stop? Owners and admins can use Pause Claire on the Claire page. It asks whose Claire to stop, then asks you for a reason and how long to pause for. Pick For 1 hour or Until 8 AM tomorrow and she restarts on her own. See Approving, pausing and taking over.
11. Make Claire sound like you
The better Claire knows your style, the less her messages read like a bot's.
Open Claire, then Settings, then My Claire, and set her name, a short bio and her opening line. Add a transfer number so she can pass hot calls straight to you. Under Settings, then Leads, choose which script each lead source gets.
Claire never uses a writing style learned from your messages until you accept it. If a contact asks her directly, she says she is a virtual assistant.
12. Get calls and texts cleared to go
Phone and text rules are strict. Yapii only lets Claire call or text people who have agreed to hear from you.
- Calls: under Settings, then Phone, Texts & Calls, confirm where your CRM leads came from.
- Texts: texting works from the start on Yapii's own carrier registration, so there is nothing you must do. If you would rather text under your own business, look at the Text Messaging Registration card under Settings, then Phone, Texts & Calls. See Texting registration.
- Automatic calls: open Automations, find the Voice caller card, set it to Enabled and turn off Require approval before dialing.
By default Claire calls between 9 AM and 8 PM in each contact's own time zone. You can change the Start hour and End hour on the Voice caller card, but the legal window always wins: she never calls before 8 AM or after 9 PM where the contact lives, and Texas and Connecticut are stricter. A setting can narrow her hours and cannot widen them. The full rules are in Texting and calling rules.
Starting Claire is not the same as consent
Yapii checks consent for every contact, every time.
13. Turn on a ready-made automation
Automations follow up on a schedule, so no new lead waits for a reply.
Open Automations and start with Inbound Template - Sellers or Inbound Template - Buyers. Each follows up over the first five days by voicemail, text and email. Read the messages, change anything that does not sound like you, then switch it on.
Templates stay off until you switch them on.
14. Send new leads straight to Yapii
When portal and website leads arrive automatically, Claire can reach them within minutes instead of hours.
Go to Settings, then Integrations, then the Lead sources tab, and copy your Lead email address. Paste it into the notification settings of your lead portals. If you would rather not touch the portals, Yapii can watch one or more Gmail labels instead: connect Gmail under Settings, then Email & Sending, and pick the labels your lead emails land in.
Then, on Claire's settings, pick the sources under Where Claire is switched on.
Lead emails are assigned, not worked
A lead that arrives by email gets an owner and stops there. It does not start a campaign or an automation and it does not arm Claire, whatever you pick under Leads. Start those people yourself once you know they are happy to hear from you. See Lead emails from your portals.
See Lead sources and routing for routing rules, and How new leads arrive for the other ways leads reach you.
From then on
Once you are set up, most days only need these four, in this order.
- Hand-offs - leads Claire has warmed up and passed to you. Call these first, while they are hot.
- Inbox - every text, email and call from you, Claire and your team, in one place. Reply to anything waiting on you.
- Tasks - the calls, texts and to-dos you owe people today, plus any transaction deadlines.
- Dashboard - who opened their home value email, who is heating up, and how your pipeline is moving.
Words you will see
Every term used here is explained in the Glossary, including workspace, contact, Claire, hand-off, automation, monthly home value email, sending domain and AI credits.
When you need a hand
- FAQ: click your name at the bottom of the sidebar, then Help & FAQ, for quick answers to common questions.
- This guide: step-by-step articles at help.yapii.com.
- Talk to a person: see Getting help and the FAQ.
Next
Finding your way around explains everything on the screen.